
Contents


Are you wasting hours manually entering Amazon sales data into Xero? Studies show that 80% Amazon sellers spend countless hours each month on accounting tasks that automation could handle.
As your sales grow and your reach expands, managing the financial side of your Amazon business can become overwhelming.
Between reconciling payments, tracking fees, and ensuring accurate tax reporting, the accounting workload grows alongside your sales.
The good news? A robust Xero Amazon integration can help you get rid of these problems.
This comprehensive guide cuts through the confusion to show you exactly how to connect these platforms effectively. We'll cover everything from the steps to integrate these tools to avoiding common setup mistakes that could cost you time and money.
Whether you're an Amazon or multichannel seller who uses Xero for accounting or an ecommerce bookkeeper, after reading this article, you'll discover how to create a seamless financial workflow that scales with your online business.
What is Xero Amazon integration?

Xero + Amazon: The ultimate plugin duo for ecommerce success
Xero Amazon integration links your Amazon Seller Central account to Xero to sync settlement reports, including details on sales, fees, expenses, refunds, and net proceeds from marketplaces like Amazon to your accounting software, such as Xero.
This setup has an influence on the accurate recording of Amazon financial transactions in Xero without manual input.
Rather than downloading settlement reports manually and typing in data row by row, the integration pulls transaction data from Amazon's API and posts it to the right accounts in Xero.
Xero doesn't offer a built-in Amazon connection. However, different third-party tools like Webgility fill this gap, making it possible to transfer data and maintain financial accuracy.
Benefits of integrating Xero with Amazon
Amazon selling presents unique bookkeeping challenges that make manual processes particularly painful. Here's how connecting Amazon with Xero brings advantages that go way beyond just saving time:
1. Automated transaction recording
Manual bookkeeping for Amazon sellers often means exporting data, copying it into spreadsheets, and then uploading it into accounting software like Xero. However, when you connect Xero to Amazon, all sales, refunds, fees, and payouts are transferred into Xero.
This automation gets rid of manual uploads and cuts down time spent on bookkeeping and reconciliation tasks, while ensuring every transaction is recorded accurately.
2. Real-time financial visibility
Monitor your Amazon performance in real-time. See today's sales, the current week's advertising spend, and the latest monthly trends without waiting for Amazon's settlement reports or manual data entry.
Real-time updates also help you make informed decisions and avoid surprises during tax season or month-end close.
3. Simplified tax preparation
For sellers in multiple jurisdictions, handling sales tax can get tricky. However, integrating these two platforms matches tax settings to Amazon's marketplace, ensuring your sales are grouped based on the right tax rates.
This makes filing taxes a breeze as you can create area-specific tax reports straight from Xero.
4. Reduced manual data entry errors
Manual data entry introduces the risk of errors like typing mistakes, duplicate entries, or missed transactions. The Xero Amazon integration automates the transfer of data, eliminating these risks. This ensures accurate and consistent financial records, reducing the time spent on corrections and giving you peace of mind that your data is error-free.
5. Comprehensive profit and loss tracking
Analyse accurate profit margins by tracking Amazon fees against your sales automatically. Determine which products are truly profitable after factoring in storage costs, what you spend on ads, and other expenses.
Prerequisites before getting started with Xero Amazon integration
Before diving into the integration process, ensure you have these basics ready:
1. Active Xero subscription with proper permissions
You'll need an active Xero subscription with appropriate permissions to add applications and modify the chart of accounts. If you work as a bookkeeper or accountant for clients, check that you have advisor access or that the business owner can give you the necessary permission.
2. Amazon Seller Central account in good status
Your Amazon Seller Central account should have API access enabled. Most integration tools require you to create API credentials, so get familiar with Amazon's developer console if you haven't used it yet.
Integration methods available
You have two major options for connecting Amazon with Xero, each with different levels of automation and complexity:
1. Manual CSV import
The basic way to handle Amazon settlement reports is to download them and import them into Xero as CSV files. This method doesn't require additional software cost, but it's time-consuming and error-prone.
You'll need to sort transactions manually, deal with multi-currency conversions, and ensure proper fees allocation.
This method works for small online retailers who're selling very few items on a single channel, but becomes hard to manage as you sell more stuff to multiple channels.
2. Using a third-party app
Unlike many other accounting platforms, Xero doesn't offer a native Amazon integration. All automated solutions require third-party applications that serve as intermediaries between these two systems. Several specialized tools excel at Amazon-Xero integration, each with different strengths.
|
A quick fact: Webgility stands out as the #1 Xero Amazon integration platform, thanks to its automated accounting that eliminates manual data entry, saving you time. With real-time inventory management, you can effortlessly track stock levels across multiple channels, ensuring you never miss a sale. Its multi-channel integration capability allows for smooth synchronization of your business operations, while the advanced reporting features provide AI-driven insights to drive smarter decisions. |
Xero Amazon integration: Step-by-step guide
Step 1: Choose your integration tool (Webgility)
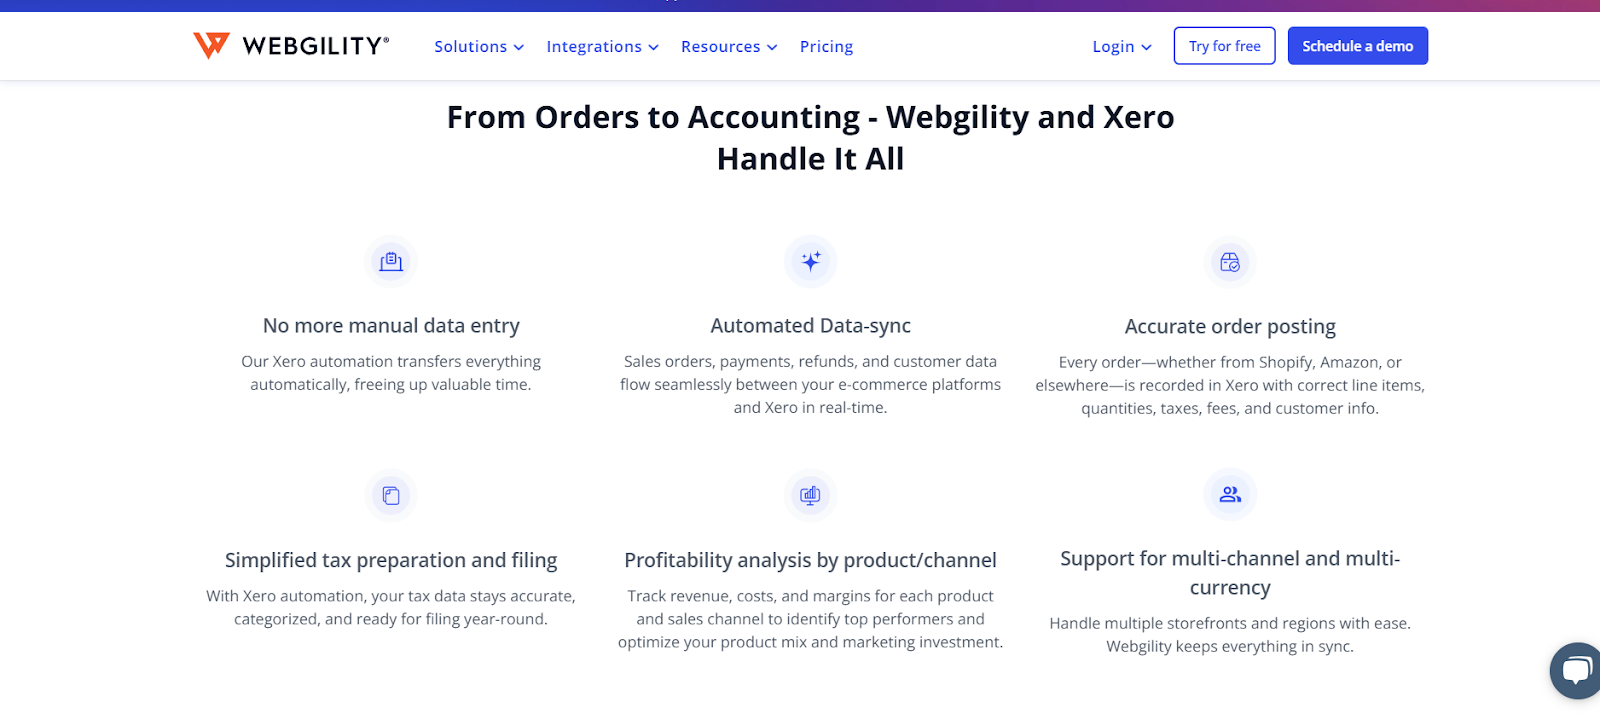
Homepage featuring their features highlights in striking, eye-catching typography
When picking a tool to connect systems like Xero and Amazon, Webgility stands out as one of the strongest and user-friendly choices for Amazon sellers. It's specifically designed to automate the flow of sales, fees, refunds, payouts, and customers, and update inventory from Amazon to Xero, making it ideal for high-volume sellers who need seamless accounting integration.
Key features to look for in an Xero Amazon integration tool and what Webgility offers:
- Automatic syncing that pulls sales, refunds, fees, and taxes directly from Amazon to Xero without manual intervention.
- Multi-region and multi-currency support for sellers operating across different marketplaces.
- Payment reconciliation that matches Amazon deposits to corresponding transactions.
- Accurate tax management that properly handles sales tax based on your locations.
- Update inventory in real-time across all sales channels, including Amazon, into Xero.
- Automated refund and return processing.
When evaluating any integration tool, do make sure to look for these key capabilities.
Step 2: Setting up your Xero chart of accounts
To ensure accurate syncing between Amazon and Xero, you'll need to configure your Xero chart of accounts to handle different types of transactions:
- Sales accounts for Amazon income: Create sales accounts to track revenue from Amazon, such as "Amazon FBA Sales" or "Amazon Direct Sales." This will help you separate Amazon income from other sources, making it easier to track and report your transactions.
- Set up detailed expense accounts for Amazon fees: Create separate accounts for referral fees, FBA fees, storage fees, advertising costs, and other Amazon charges. This granular approach helps you understand the true cost of selling on Amazon and identify opportunities for cost optimization.
- Configure sales tax accounts by jurisdiction: Set up sales tax accounts according to your jurisdictions. Amazon collects sales tax in many states, but you may still have tax obligations in others. Proper sales tax account setup ensures compliance and simplifies tax filing.
- COGS and inventory tracking: Set up Cost of Goods Sold (COGS) and inventory accounts to track product costs and inventory levels. COGS will help you monitor the expenses related to your products, while inventory accounts will ensure stock levels are accurately updated in Xero.
Step 3: Installing and setting up your integration tool
1. Signing up with your integration app
Start by signing up for your chosen integration service and selecting the appropriate plan based on your transaction volume and feature needs. You can find Webgility on the Xero App Store or visit the provider's official website.
2. Installation process
During installation, you'll typically install an app from Xero's app marketplace or configure a cloud-based service that connects to both Amazon and Xero through APIs. Follow the setup wizard carefully, as initial configuration choices affect how data flows between systems.
3. Initial configuration settings
Once installed, it's time to configure the tool with the appropriate settings. This includes selecting the currency for your transactions, which is especially important if you are selling internationally. Additionally, you'll map default accounts for Amazon's financial data, such as sales revenue, fees, and refunds, so the tool can automatically categorize the data correctly in Xero's chart of accounts.
4. Connecting Amazon Seller Central
The next step is to link your Amazon Seller Central account to the integration tool. You'll need to log in to your Amazon Seller Central account and allow the integration tool access to your sales, fees, refunds, and payment data. This connection is critical for the tool to pull the correct data from Amazon and send it directly to Xero.
Note: Store these credentials securely and never share them with unauthorized parties.
Step 4: Mapping your Amazon data to Xero
Data mapping determines how Amazon transactions appear in your Xero books. Here's how to set up accurate mappings:
1. Set up product mappings
Start with product mappings by categorizing your products into logical groups that align with your chart of accounts. You might group by product type, brand, or margin profile, depending on your reporting needs.
2. Configure sales tax settings
By configuring tax settings accurately in Xero, you ensure that tax is applied correctly for each sale and is categorized properly in your tax accounts. This is especially crucial if Amazon automatically calculates and remits tax, as you'll need to match their tax settings to avoid discrepancies when filing taxes and closing books.
3. Map Amazon fees to appropriate expense accounts
Assign Amazon fees to appropriate expense accounts with specific attention to how different fee types should be categorized. Referral fees might go to a general "Marketplace Fees" account, while advertising costs should be tracked separately for marketing analysis.
4. Configure multi-currency handling
For sellers operating in multiple currencies, set up multi-currency handling, including exchange rate sources and conversion methods. Consistent currency handling prevents discrepancies that can be difficult to reconcile later.
Step 5: Testing your integration
Before you go live with real data, you need to test to make sure your integration works. Here are the steps to test:
1. Run test transactions
Start by importing a small set of old data or using dummy transactions (if available). This lets you see how sales, fees, and other data enter Xero without messing up your actual books.
2. Verify data accuracy
After you import the data, sign in to Xero and look over the posted transactions. Make sure the totals line up with your Amazon reports and that Xero has recorded taxes, fees, and refunds accurately. It will confirm that your data mapping, account setup, and tax settings work as you expect.
3. Check automated entries
Take a deeper look at how Xero formats the transactions. Check if it is using the right accounts, applying tax rates the way they should, and does it include all the important details (like order numbers, SKUs, descriptions)? This review will help you ensure the automated entries are clean and match your bookkeeping preferences.
4. Troubleshoot common issues:
When you're testing, you might run into typical problems like SKUs that aren't linked (missing product mappings), incorrect or missing tax codes, or sync errors due to permissions or setup gaps. This is your opportunity to fix any inconsistencies so they don't cause trouble down the road.
Avoiding common Xero Amazon integration mistakes
- Incorrect tax mapping
- Missing transaction types
- Overloading Xero with order-level data
- Ignoring sync errors
- Forgetting to update tax settings
- Using inconsistent date ranges for reconciliation
- Ignoring multicurrency settings
- Skipping chart of accounts setup
- Failing to test the integration before going live
Pro tip: Regular reconciliation processes ensure your integration continues working correctly over time. Develop a monthly routine that compares Xero balances with Amazon settlement reports and bank deposits.
Sync your Amazon and Xero accounts today!
Amazon Xero integration not only simplifies complex financial management but also paves the way for improved cash flow visibility and operational efficiency.
Throughout this guide, we've covered essential aspects that will help you set up Xero Amazon integration to streamline your business growth.
Remember, the platform you choose for integration will determine how smoothly your financial data flows between platforms later. Furthermore, choosing an integration tool that syncs summary-level & granular level accounting, real-time inventory updates, and margin & COGS analysis into Xero can create a foundation for sustainable growth.
One such platform you can bet on is Webgility.

Visual overview of Webgility’s cloud-based accounting features
Selecting this ecommerce accounting automation tool will deliver more than just time savings and audit-ready books.
Start your Amazon-Xero integration today with Webgility and unlock your business potential!
.png?width=56&height=56&name=image%20(3).png) Yvette Zhou
Yvette Zhou


