.png?width=96&name=image%20(9).png)
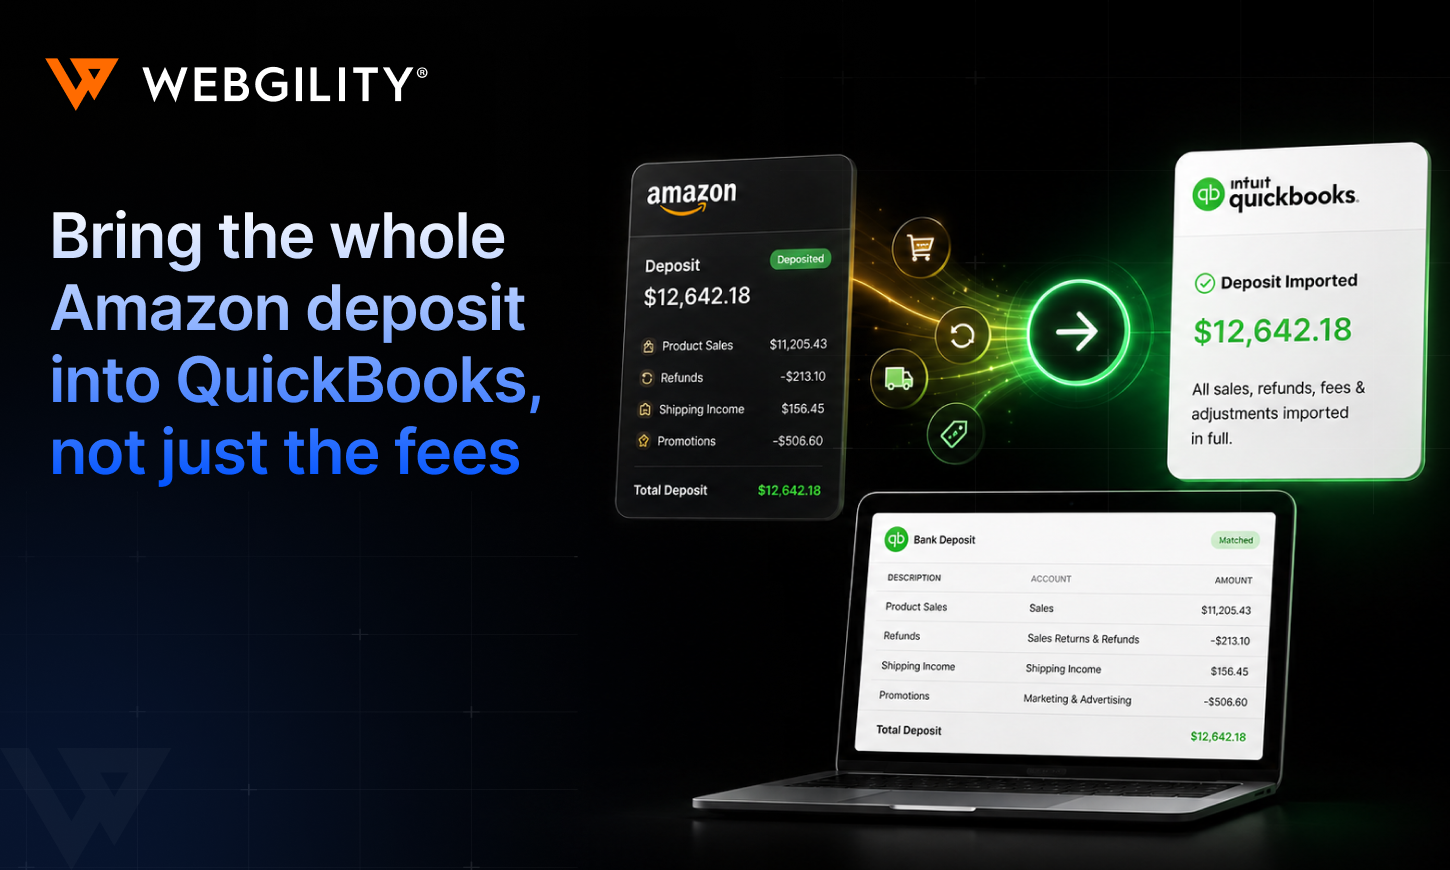
Bring the whole Amazon deposit into QuickBooks, not just the fees.
Your Amazon fees post automatically. Your orders post automatically. Your orders post automatically. But the deposit is different: Amazon nets your revenue, refunds, and fees into one lump sum, and QuickBooks can't tell if that lump belongs to sales you have already recorded.
And it's easy to get wrong. The deposit can't be booked as new sales (you'd double-count revenue you already posted) or ignored (your clearing account never clears). It has to be a Transfer, with the exact net amount, date, accounts, and Settlement ID. One wrong field throws your clearing account out of balance until month-end.
So, the actual deposit, the money that hits your bank, still lands in QuickBooks by hand, every single settlement.
Not anymore. Webgility now posts the net deposit as a Transfer between the two accounts you choose, dated and stamped with the Settlement ID, so a matching transaction is waiting when the money lands. Zero clicks, always on.
The Problem Unpacked: Amazon deposits your books can't explain!
You’ve made $100K sales through Amazon in the last 2 weeks. Of this, you can see that Amazon deducted $8K in referral fees and $5K in FBA. And then you had another $2K lost to refunds.
That’s ok. Webgility has already been posting each order level detail throughout this time, so you already have some $120K undeposited funds in your Amazon clearing account in QuickBooks.
And then a deposit of $85K arrives in your bank feed. This starts a new riddle: How do you record this actual deposit to your books?
You can’t create a new sales record because that would be double-counting.
Webgility Online now automates the entire Amazon Settlement workflow, helping sellers record fees, post net deposits, and keep their clearing and bank accounts aligned without manual data entry.
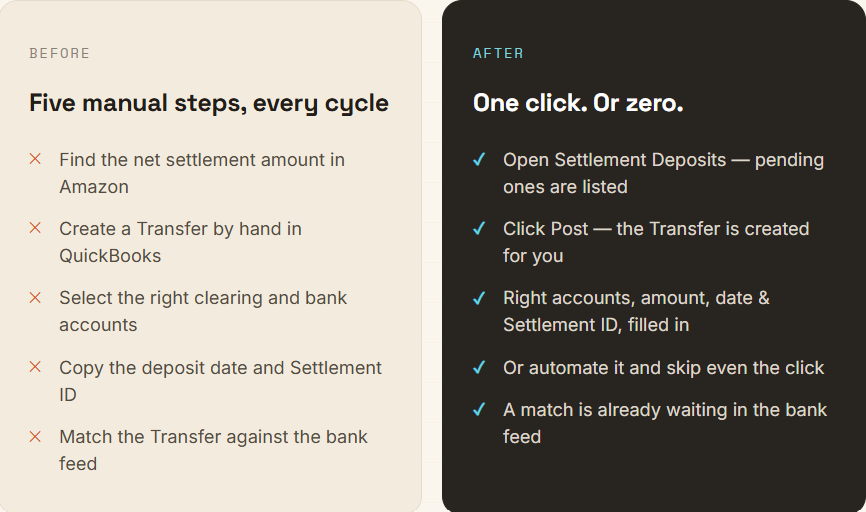
From five manual steps to one click or none.
Before vs. Now. What changed?
Take a scenario
Before this feature: Webgility could already post Amazon orders, refunds, and fees into QuickBooks. But when Amazon sent the final net settlement to your bank, that deposit still had to be handled manually. You had to create a Transfer in QuickBooks, choose the right clearing and bank accounts, enter the amount and date, add the Settlement ID, and then match it to the bank feed.
Now: Webgility also posts the net settlement deposit as a Transfer. It moves the exact amount from your Amazon clearing account to your bank account, uses the deposit date, adds the Settlement ID, and can do this automatically on your sync schedule.
Example: Say Amazon pays you $18,450.62. Earlier, your orders, refunds, and fees could already be in QuickBooks, but you still had to manually create the $18,450.62 Transfer when the payout reached your bank. Now, Webgility creates that Transfer for you, so when the deposit appears in your bank feed, the matching transaction is already there.
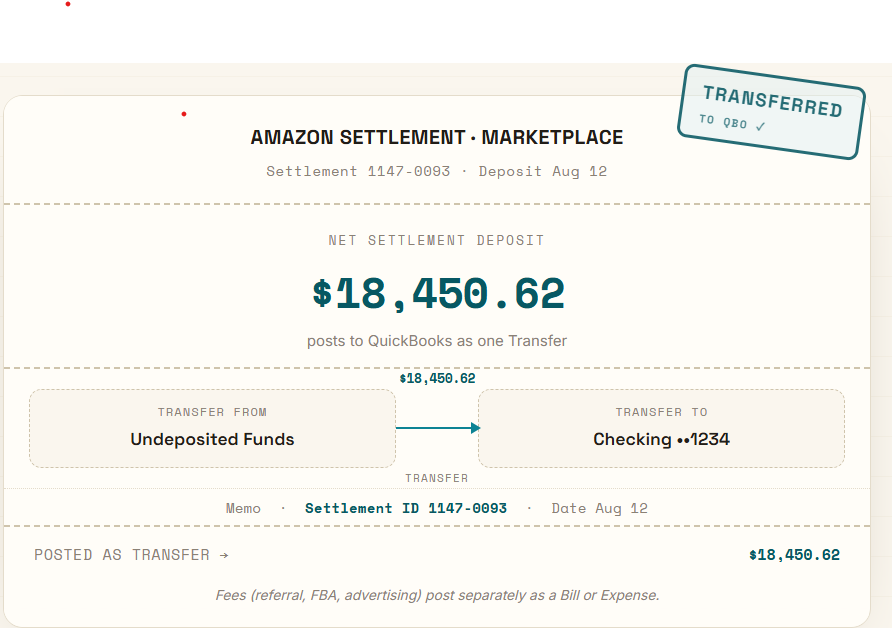
Post the full Amazon settlement as one Transfer.
When the $18,450.62 shows up in the bank feed, there's already a matching transaction waiting. Nothing is retyped, nothing is guessed, the seller just clears the match and moves on.
Complete control over where the money moves
You decide exactly which two accounts the Transfer runs between. You tell Webgility a transfer-from account: the clearing account where your Amazon orders, refunds, and fee payments accumulate (for many sellers, Undeposited Funds), and a transfer-to account where the real bank account Amazon deposits into.
Every settlement then moves cleanly from one to the other, the way your accountant already expects it to.
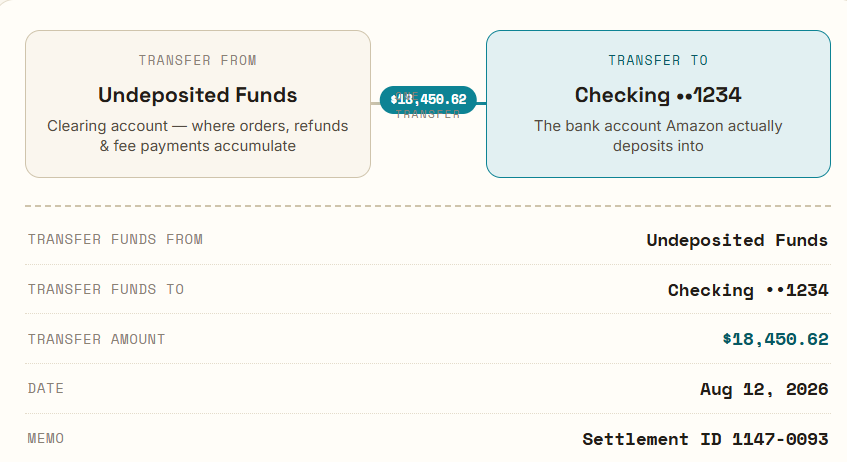
Move each deposit between the right QuickBooks accounts.
One decision, per marketplace
If you sell across more than one Amazon marketplace (say Amazon.com and Amazon.ca), each store is configured on its own tab, so you set the account pair once for each.
And a quick heads-up: for this to reconcile cleanly, every Amazon order, refund, and fee payment needs to deposit to the same clearing account you pick as your transfer-from. Anything posted to a different account will throw off the match.
Know the difference: Not the same as Walmart
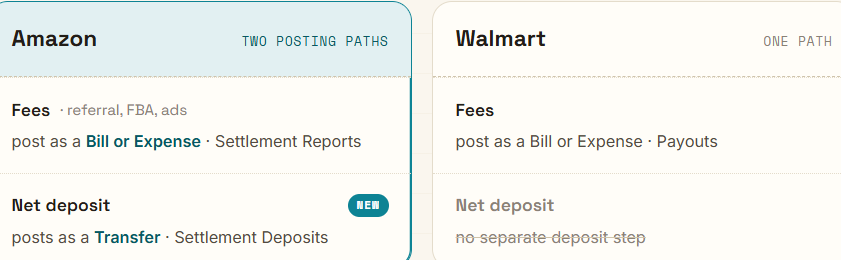
Amazon posts fees and deposits through separate paths.
If you sell on both marketplaces, it's easy to expect them to behave the same way. They don't, and the difference is worth knowing:
Amazon has two posting paths. Fees (referral, FBA, advertising) post as a Bill or Expense from the Settlement Reports screen; that's a separate, existing capability. The net deposit posts as a Transfer from the new Settlement Deposits screen.
Walmart, by contrast, has no separate deposit step at all; only the fee portion posts. So if you run both channels, expect Amazon to give you a full deposit Transfer that Walmart won't.
In practice
An accountant reconciling the month wants the bank feed to clear without manual entries. Because the deposit posts as a Transfer between accounts, not as new revenue. Amazon's sales aren't double-counted; that order revenue already flowed in when the orders were posted.
The Transfer simply moves money the books already recognized into the account where it actually landed.
Little things toward faster reconciliation
The Settlement Deposits screen in Amazon Seller Central lists each Amazon deposit with its status, so pending deposits are easy to find and post or filter by store if you run more than one marketplace.
Post the first one by hand, confirm the Transfer landed between the accounts you expect, and automate the rest. From then on, each settlement arrives already transferred, giving you a clean trail from Amazon's settlement to QuickBooks and the bank.
What posts to QuickBooks, and what doesn't
This feature posts one thing: the net settlement deposit, as a Transfer. It doesn't touch your fees; those already post separately as a Bill or Expense from the Settlement Reports screen.
→ Learn more about Amazon Settlement Reports and how they work
Think of it as the piece that completes the picture: fees on one side, the deposit on the other, and now both automated end-to-end.
1. Two accounts, one Transfer
Setup comes down to a single decision made once per Amazon store: which two accounts the money moves between.
The transfer-from account is your clearing account where Amazon orders, refunds, and fee payments already post (commonly Undeposited Funds). The transfer-to account is the bank account Amazon actually deposits into.
When you post a deposit, Webgility creates a Transfer with Transfer Funds From and Transfer Funds To set to exactly those accounts, the Transfer Amount matching the net settlement, the Date matching the deposit date, and the Settlement ID recorded in the memo for traceability.
2. Post on demand, or turn on automation
Posting a deposit by hand is a checkbox and a button. Select the pending deposit on the Settlement Deposits grid, click Post to QuickBooks, and the button moves through a posting state while the Transfer is created. When it lands, Webgility confirms it and the deposit drops off your Pending list.
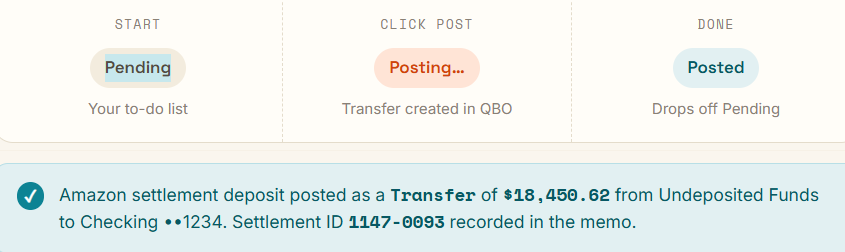
Post a pending Amazon deposit in one click.
Once you've watched a manual post land the way you expect, hand the rest off. In Scheduler Rules, turn on automatic settlement-deposit syncing for your Amazon store, and Webgility posts each pending deposit on your regular sync schedule using the accounts you already configured.

Automatically sync every pending settlement deposit.
In practice
A seller posts the first couple of deposits by hand, confirms each Transfer moved between the right two accounts, then flips on automatic syncing. From then on, every Amazon deposit is transferred in QuickBooks before they've even opened their bank feed; reconciliation becomes clearing matches that already agree, not data entry.
3. Skip a deposit you don't want: IGNORE
Not every deposit needs to be posted. If there's a settlement you don't want Webgility to record, use IGNORE: it removes the deposit from your Pending list without creating any transaction in QuickBooks.
|
Good to know Once a deposit posts, it leaves the Pending list, so the everyday flow doesn't tempt you into posting the same settlement twice. Pending is your to-do list; posting and ignoring are the two ways a deposit comes off it. |
4. Set it up in a few minutes
Setup happens once per Amazon store.
|
Before you start: This feature requires QuickBooks Online . |
Configure: once per Amazon store
- Go to Sync Settings, select your Amazon store, and open the Deposits tab. If you have more than one marketplace connected, use the store tabs at the top to configure each individually.
- Turn on "Download and process the net deposit?" Two required fields appear.
- Under Select account to transfer deposits from, choose your clearing account (for example, Undeposited Funds).
- Under Select account to transfer deposits to, choose the bank account Amazon deposits into.
- Click Save. Repeat for each Amazon marketplace you connect.
Post a deposit
- Go to Settlements → Settlement Deposits and use the store and status filters to find your Pending deposit.
- Select the deposit and click Post to QuickBooks. The button shows a Posting… state while the Transfer is created.
- When it finishes, a confirmation appears and the deposit disappears from the Pending filter. Open the Transfer in QuickBooks to see the from/to accounts, amount, date, and the Settlement ID in the memo.
Automate (optional)
- Go to Automation → Scheduler Rules and find the Expenses & Fees section for your Amazon store.
- Turn on "Sync Settlement Deposit automatically" and click Save.
FAQs
Is posting a deposit the same as posting my Amazon fees?
They're separate actions. Fees (referral, FBA, advertising, and so on) post as a Bill or Expense from the Settlement Reports screen. The net deposit posts as a Transfer from the Settlement Deposits screen, either on demand or automatically.
What if the deposit amount in QuickBooks doesn't match my bank statement?
Make sure all your Amazon orders, refunds, and fee postings use the same clearing account you selected as Select account to transfer deposits from. Transactions posted to a different account will cause a mismatch during reconciliation.
What transaction does Webgility actually create?
A Transfer in QuickBooks Online: Transfer Funds From and Transfer Funds To are the accounts you configured, the amount matches the net settlement, the date matches the deposit date, and the memo records the Settlement ID.
I sell in more than one Amazon marketplace. Do I set this up once?
Configure the Deposits tab for each marketplace separately, using the store tabs. Each store gets its own transfer-from and transfer-to accounts.
| Reconcile Amazon end-to-end, not by hand Set the Deposits tab once, post your first settlement, then let automation carry the rest: fees on one side, the deposit on the other, both in QuickBooks before you open your bank feed. |
.png?width=128&name=image%20(9).png)